You are hereForums / By Discipline / Mountain (off road) / MTB Gear / My Italian Stallion (N+1)
My Italian Stallion (N+1)

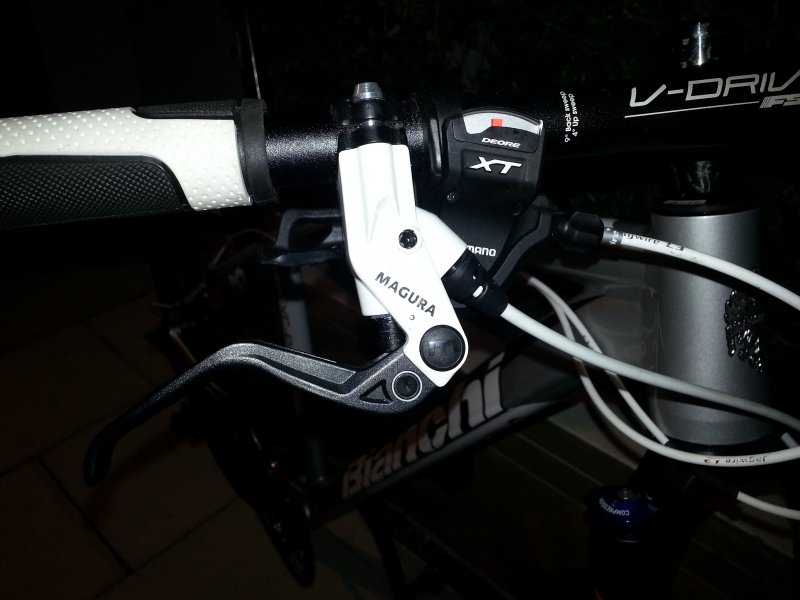
I picked her up this afternoon and took her a spin around Sydney park, first impressions are great.
The real test will be this weekend on the trails, I see there is a club race at Yellowmundi, which is tempting.....
Edit: It's a Bianchi Jab 29.1 with the fork upgraded to a RS Reba.


- Login to post comments
- Bookmark & share
Tags
Thats really nice.
You should have scammed Liam for a bottle-cage though!
Upgrading the fork is a good idea - it affects the bike a great deal.
All you need to do now is convert those wheels to a tubeless set-up and you are ready to race.
You just reminded me that I really need at hard tail 29'er. Why not go Euro?
Beautiful bike mate, that thing looks bad ass
Thanks guys, I'm really chomping at the bit to get out on it now. I measured the wheelbase of the Bianchi and compared it with my Felt and they're exactly the same, the height of the crank from the ground is the same too. I thought they'd be bigger!?
I am going to go tubeless but I'm not sure what tyres to go with. I'll try these tyres out with tubes for now before covering my rims in sealant.
Its a discussion for another forum / thread - but the tyres you have on there will be fine run as tubeless, so you wont need to buy new ones.
All you'll need is a pair of 26" inner tubes, a bottle of sealant, and a sharp craft knife.
Get onto Youtube and search 'Ghetto tubeless' - there are a couple fo good instructional videos on there that will save me from descrbing the process here.....
If you do end up going that route, try and get the 26" inner tubes with removable valve-cores. It makes topping up sealant very easy indeed.
Thanks for the heads up on the tubeless, I'll definitely go down that route as soon as I'm sure I've got the right tyres.
After 3 laps of Ourimbah this morning, I'm still not sure the Small Block Eights are for me. They occasionally lost traction when climbing and didn't seem as sure footed as the Crossmarks on my other bike. I'll give them a bit more time to prove themselves yet though.
On another note - I love the 29" wheels! I didn't really notice it was any slower to accelerate but once momentum is there, it's so much easier to keep it going. There aren't many switchbacks at Ourimbah, but the few near the end on the climb were no more of a problem than on my 26". The wheel base on the Bianchi is the same as my Felt so maybe that's why it seemed to handle very similar. I rotated the handle bars round so they point down, which my seem strange to everyone but felt more comfortable to me and reduced the pressure on my outer palms.
Just remember that one the bigger wheel, you can run your tyres a little bit softer - that will give you much better traction.
I run 28psi, (weighing about 79kg) and Jenny runs them as low as 18psi (54kg - ish)
Small block 8's should be superior to a Crossmark in almost every riding condition.....(not wanting to get into a tyre debate - but just sayin')...
I've got them at around 39psi - mainly to avoid pinch flats.
Tubeless and a lower pressure it is then.
39psi is pretty high, I run my 29er tyres between 25 and 30 normally around the 28 mark at Ourimbah and I definetly get less flats than on my 26er which I run at around 35.
I'm 94kg with out my gear & only run 35psi at the very most on my 29er HT
I run 22-24psi on the front and 26-28psi on the back on my 29er HT. That's also running 1.9 Kenda Karmas tubeless.
I've always run high pressures as when I first started MTB ing, I got a lot of pinch flats. I don't seem to have a problem with traction and as a bonus the rolling resistance is lower. The only real problem I get some times is the back wheel bouncing up. I'm about 83kg so no heavy weight.
I'm going to convert to tubeless one day this week. I'll let you know how I got with the lower pressure next weekend.
Pinch flats can be a real problem on HT's (depending on the terrain of course).
Before I moved to a dually and UST, i started getting pinch flats a lot on my HT. Just riding too fast to get the back wheel over a rock etc, but too slow/ not enough skill to jump it entirely.
Getting a larger tyre (2.3+) can help prevent flats or rim dings while still being able to run a lower pressure.
Also, if you have good UST rims and tyres, there is no need to run any 'goo'. Ive been using XT rims with Maxxis LUST for ~6 months now. Rims have a few nicks in them and most of the writing on the sidewalls has been scrubbed off, but still no flats. Goo just makes it a real PIA to change tyres, and any puncture they don't self-repair leaves you with a dirty sticky shitty job on the side of the trail putting a tube in.
IMHO.
Bontrager rim strips are the go. Much easier than Stans to air up, plus lighter and more secure. Got mine from Clarence St Cyclery. Cheaper than Stan's too, even after adding the extra for the goop.
I disagree that Bonty rim strips are good.... I had nothing but problems with them on my DT rims.
Ultimately Tubeless Ready rims are the simplest safest and easiest way to go tubeless but at a cost....
I've never used Stan's rim strips, but instead went Ghetto with fibreglass reinforced tape to seal the spoke holes on DT rims after the bonty debarcle.
Agree with your there. Definitely prefer UST myself, although the Stan's Arch rims look like they'd work well with a similar profile.
Interested to hear what your issues were with the bonty rim strips. Perhaps they were incorrectly sized for your rims? Worked brilliantly with the entry level Mavics I converted.
In contrast I *really* didn't like the Stan's rim strips on the DT Swiss 430's I put on junior's bike. PITA to air up. Couldn't get the Conti tyre on regardless of how many levers I used and had to admit defeat and try a Maxxis.
Pete B: Raising tyre pressures on dirt does not necessarily reduce rolling resistance. for example see the tyre pressure section on http://www.mtbonline.co.za/info/mtb-tyre-rolling... . Rolling resistance (RR) on the road is dictated more by tyre pressure than construction. On dirt it seems that there are a few factors that effect RR, construction (wall flexibility), width, tread design, and tyre pressure. The general advice seems to be to reduce rolling resistance on dirt reduce tyre pressure.
The above site when covering tyre weight and pressure makes the conclusion "To accelerate a pair of tyres with an extra weight of 500 g from 0 to 25 kph in 4 seconds requires an additional 4.2 W power. On the other hand the wider tyre on a grassy surface saves you 15.5 W against a narrower specimen, and this at the low speed of 9.5 kph. Moreover the rolling resistance reduction has a continuous effect while lighter weight is only of relevance during acceleration".
and also states "Anyone who wants to ride really fast off-road needs to decrease tyre pressure"
Given the very wide variety of conditions we meet I'm not sure the above applies to all them.
FWIW.
Bloody hell, that all seems a bit complicated! :0) I'll run a low pressure and see how it compares to my current pressure.
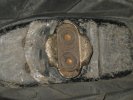
I've just setup my tyres using the ghetto tubeless method. The rear wheel was a bit of a pain to get seated properly but after 15 minds of strange looks in the servo, I got it inflated. I have a couple of questions:- 1, I lost a fair amount of fluid out of the rear when inflating, how can I top it up? 2, There's a small amount of air leakage around the edge of the rim, it appears to be slowing down but will it stop altogether as the liquid sets?
Once seated, let the air out, unscrew the valve, remove, and inject the stans with a syringe
Photo of air leaking around the rim.
The guy that did my tubeless said Not to use the wheel and to keep tyre pressure up at 50 psi for 24-48 hrs in order for the tyre wall to create a built proof seal around the rim. After that reduce the pressure to your preference and ride. I did what he said and I've had zero leaks or issues since he did it over 4 months ago.
Not sure if this is true and I'm sure many will disagree but it worked for me!
Just sloosh the sealant around with the wheel held flat on one side, and it will plug the holes and all will be good. Eventually.
You need to do that anyway with non-UST tyres as the sidewalls are often porous. Use the soap suds bubbles to show you where to sloosh.
I went out to the shed this morning and both tyres have lost all their air.
What a waste of time and money! I'm going to buy two new tubes and go back to how it was. $50 to end up where I started and the joy of cleaning all the stans off my rIms and tyres.
Stick with it. My Kendas not being ust tyres can take a bit to get a lasting seal but well worth the effort.
Pete, tubeless has huge advantages - less flats, faster over rough ground, more comfortable - did i mention less flats?
You seem to have decided to have a go which is great, but if you are doing it on your own with no experience then you have to read up a bit on it to get it done - no-one on this thread has written a full guide for you, only small tips, assuming you would have read the guides, either on this site or rotorburn, mtbr, pinkbike etc etc.
I like many people here are constantly amazed at races how many people are ripping out tubes at the side of the trail after a fast descent - lose 5 minutes on a lap for no reason at all. It isnt hard, its just you havent read up on the technique yet or had someone show you.
I typed Ghetto Tubeless into you tubes and followed the one that was meant to be easier and cleaner. I did get a seal last night but it won't hold over night. Not sure where I'm going wrong.
When I decided to go tubeless I also made the decision to spend a bit extra for tubeless-ready rims and to only buy tubeless ready tires. It cost a bit more up-front, but I've now been running it for almost 2 years without a single flat.
From what I've read as well it makes the initial installation/seating of the tires a LOT easier. I know I've never had any trouble anyways, and I just use my stand pump at home for the first seal.
For me anyways it's worth it to spend a bit of extra up front to save all the hassle and frustration!
dp
Did you use the 20" BMX tube method, or the gafa tape one?
All comments apply to the gaffa tape one - ie the tape thats waterproof and can be torn lengthways - the tape has to be covering the spokes and the bottom of the well but not up the sides. Once inflated and properly and evenly seated (usually around 50psi), I put 2 measures of stans in with a syringe.
Then reinflate, hold tyre parallel to the ground, much swirling and shaking so the goo gets a coverage everywhere inside the tyre, turn the wheel over and do it again. I then check for leaks, and if i get any, concentrate the fluid in that area untill it seals up.
Leave overnight. If its down, re-inflate and go through the process again with shaking and carrying on - about 2 - minutes per tyre. You should be no a weight weeny on the amount of stans - follow instructions for high volume tyre, not a skinny 26er, which i think is 2 of their scoops from memory.
the tyre going down is not a failure, it just tells you it has weak sidewalls. BTW sometimes the valve leaks (assuming you are using tubeless valves) either not tight enough or they need a bit of sealant around them - i've actually used a bit of silicon in the past to get this bit right on a real problem rim. Put em in water and figure out wher the leak is exactly - makes things heaps easier.
EDIT _ in the video, he mentions he is using UST tyres, you are not - the sidewalls on UST are thick and heavy and dont leak air, sidewalls on tubeless ready or std tyres are thin and need the sealant to seal up the sidewalls.
I'm using the gaffer tape method. I trimmed any tape that went up the sides of the rim. I may go and buy some more sealant and give it another go.
Thanks for the encouragement guys.
watched the video - if you use the material gaffa tape - stuff that bullshit with the stanley knife - just start a tear right in the centre and start putting it on (for next time), and roll the tape round the wheel - it will continue to tear straight, and leaves you with a half width on the other side of the roll. the half width will make sure it doesnt go up the sides of the rim, which can compromise the seal.
poinjt 2 - those little bottles of stans are a rip, get the big bottle. also allows you to put in a little extra as margin for safety (and you sure will appreciate it when the day comes and it saves you with a stream of fluid coming out of your tyre for 20 seconds while it seals.
point 3. are your rims welded or pinned? If welded all good, if pinned on the join - this leaks, i had to use polyurethane sealant on pinned rims on the edges - but stans would eventually seal it i guess.
4 - next time you put in an order for bike bits - add some stans valves to it - they are super handy to have as spares, and work better than the ghetto options - particularly with removal on the trail (stans is great, but wont seal a tyre wall rip)
5 have fun - you are learning a skill for life ;D
If your rims are pinned, the usual recommendation is to use the 20" BMX tube option for ghetto, although that size applies to 26" rims.
For 29er rims, you might need to look at 24" tubes.
Fankles recommended using Schwalbe BMX tubes when we were talking about it back in his BA days, as the valve core is removable.
My non-UST Specialized tyres deflated on my first attempt, as someone else said non-UST side walls etc were not designed to hold air.
I found the best solution after inflating them is to go for a few sprints around the car park so the Stanz gets sprayed around inside the tyre so everything gets nicely coated.
If it deflates again pump it up and repeat.
Normally now good for several months before they deflate fully. Sad that I know this but one of my bikes hasn't had much use lately. Note as with any tyre checking pressures before every ride is recommended.
Also before blasting them with air I have the wheel vertical, grab the axle and push the rim into the tyre into the ground so that the wheel is in a pinch flat position and then rotate the wheel and repeat. This helps me seat the tyre into the rim so that when I pump air into it I get practically no blow by of fluid. I also don't need servo compressed air and find my cheap $40 Joe Blow track pump does the job for 2.3 tyres.