You are here
nobmob.com

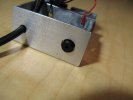
Back Wire Sealed

The power wire has been sealed in place here, switch and joins between the aluminium angle still need doing.
Back Unsealed
The back of the controller before being sealed up. The switch will be covered and the power wire will have masses of sealant put over it inside the box to act as cable anchor.
Glue Switch

We need one momentary push to make switch as a control. This setup works really well - it's a small tactile switch glued (with Araldite) into a hole. To keep things water tight the other side is covered with silicone sealant which still allows enough movement for the switch to function.
Fit Lenses

Ledil lenses... they have to be machined a bit to fit over the LEDs when wires are soldered on.

Wire Up

Wiring complete. The black 'bulge' in the wire is the bFlex controller. After soldering up just wrap it in electricians tape to stop it shorting on the housing and rattling around.
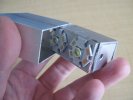
Drill Box

The controller housing with a few holes drilled. Opposite side of this has the LEDs attached. Wires will be fed to them through the small holes you see here.
The two large holes in front are for power wire and control switch.
Box Fit
The part with LEDs slides snuggly in - not like this of course, this shot is just to get an idea of size.
Box + LEDs

Housing box with LEDs attached. The gap behind the LEDs is where the bFlex controller will fit, then that part slides inside the other.
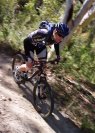
Simpson Desert Challenge
In case you are sane enough not to have seen this, results are in:
http://www.desertchallenge.org/race_report_2007....
http://www.mtba.asn.au/news/?IntCatId=20&IntCont...
...only 2 competitors were able to ride the full 100% of the course – 592 km in 9 stages over 4½ days
Soft! </tic>