You are here
nobmob.com

Rob's Homemade LEDs - Rear View

As you can see, the control unit is quiet slim and fits really nicely this way round. Thanks to Stuart for his suggestions here, originally it was going to sit across the helmet.
Rob's Homemade LEDs - Front View
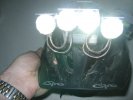
Don't look directly at the lights!
Erm... does my helmet need a wash? 
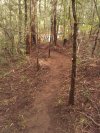
Rob's Homemade LEDs - Side View

Will probably use another strap (two in total) for real. Might also pad some more under the back of the control unit.
Sealed Up

After the sealant is applied and dried we're pretty much done.
It's still looking a little rough. Although the rough edges could be trimmed perhaps doing so would reduce the effectiveness of the seal so it will probably stay looking like this.

Red Hill - Sat 2nd 7am
Hiya All,
If anyone is interested a couple of us are riding Red Hill on Sat 2nd. Start at 7am at the carpark.
Hopefully see some of you there.
Evan
Seal it Up

Onto the final stretch now - away we go with a few irreversible (well, not easily changed anyhow) steps.
After making pretty sure we're happy with the choice of diffusers begin to seal the lenses into tubes. In the background you can see the power cable has been switched for a final curly one picked up from Jaycar - this has also had sealant applied.
This is a bit warts and all - see the extra two holes on the third (from left) tube? Don't worry - once sealed no-one will know.
The sealing looks a bit rough but again don't worry, this stuff can be trimmed when dry with a sharp knife.

Brindabella Challenge Epic (Social) Ride
Hi,
I've been considering this for a while and was wondering if anybody else was interested or already going down to 'Bra for it?
http://www.corc.asn.au/events/details.asp?IntCon...
Looks like a great fun intro to the area and there looks to be a lot going on that weekend so I'm pretty keen to head down and make a full weekend of it, plus the girlfriend's away so I'm allowed!
70k's a fair ride but the detail suggests some is on road and it's social rather than comp so you can take it at your own pace.
Let me know if you're going and if you've been to 'Bra before and know of any suitable accommodation I'd much appreciate a post.

no more riding alone.
Hi all,
My name is Luke and i have recently moved to the northern beaches from the Blue Mountains.I'm keen to meet some new faces and ride some of the local trails around the area. I have been treking back to the mountains on occasion to ride but really want to explore the local trails with company as riding alone is quite boring after a while. I enjoy single track/xcountry riding mostly. I can ride on a sunday usually, is any one able to help me out?
Cheers
Luke.
Prepare Veroboard

Before starting to solder stuff up it's best to cut the Veroboard and make sure it will fit in the enclosure and has the required number of tracks left after cutting.
There's a couple of unplanned chops top of the board here - they are to make it fit round the slots in the planned enclosure. Luckily that track didn't figure in the final design so no biggie.
Note I only bothered to drill two support holes at this stage also - the PCB was very easy to drill so didn't worry too much about doing the others when it was working.
It was all looking good here, so away we go.
Pad the Underside

As it stands, trying to strap something made from plastic and aluminium to the top of a helmet probably isn't going to be very successful, and is also probably going to damage said helmet.
Luckily a mate handed over the end of a roll of this self adhesive foam stuff. The roll (50mm) is the almost exact same width as the component box from Jaycar (53mm) so no trimming along the length is required. Cut a couple of pieces and stick them on for a surface with more grip and a less damaging finish.