
You are here
nobmob.com

Single Lens Bolted

Use the MCPCB as a guide and drill a couple of holes in the bottom of the Berocca tube. These have to be really very accurate - the lens won't fit if it's more than probably half a millimetre out.
The bolts (screws) here are 2mm and as you can see, there's hardly any clearance, but just enough, between their heads and the LED contacts.
I had a couple of accidents trying to bolt through the aluminum where the holes behind were not perfectly aligned. That meant the screw heads were not perfectly flat on the MCPCB and cut into it causing a short. Very bad, but if this happens repair it with nail varnish.
Single Lens
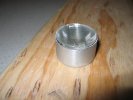
A single lens in Berocca tube (with 8x25 degree diffuser that we won't be using) - fits perfectly.
Note the gap around the edge where we'll be sealing the lens in later.
Cut Berocca
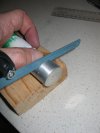
Initially I thought using a Dremel (rotary tool) with disc cutting wheel would be a good idea, but no - stick with the hacksaw here (using finest blade you can find).
Don't press too hard - the tubes are quiet thin and bend easily.
Measure Berocca

Take the optic and mark the Berocca tube using felt pen by turning the tube on a flat surface.
Note the yellow paper atop the lens to protect it, which happens to be the same thickness as a diffuser.
Initially I forgot to include the LED mounted on MCPCB (about 1.5mm) when making this measurement but that turned out to be a blessing - it will mean the optic/tube can be sealed below (around the side) rather than having to struggle with trying to get a clean seal on the face of the optic.
See Rob's Homemade LEDs for more about this.
Clean Berocca Tube

Berocca tubes scrub up nicely (with P280 wet and dry)... astute readers will notice this is Indonesian Berocca 
Dim as Possible
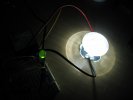
Testing Cree XR-E LEDs... on the right is a single XR-E with L2 Optic mounted. This is driven from the Luxdrive 3021 BuckPuck with about the lowest current that it can supply and still have the LED light - about 5mA! On the left is a 'standard' green LED for comparison.
This is pretty amazing given the Cree can be driven up to 700mA or with 140 times more current.
Cutter Delivery
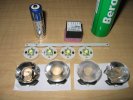
Parts purchased from Cutter Electronics... Cree XR-E LEDs, Luxdrive Buckpuck and L2 Optics... erm... optics and diffusers.
Plus an AA battery and Berocca tube for scale.

Whats your favourite MTB brand for bikes?
Rob's Homemade LEDs (MK1)
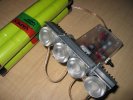
Two, 8 cell NiMH battery packs behind supply 19.2v. These are 4/3C size or something. Switch at back is on/off, switch on side is 3 position dimmer.
For a sense of scale, enclosure is 84x53x30mm and fits very easily in palm of my hand.
Don't worry about the apparent ill fitting of the lenses - they will be sealed in when a final decision on diffusers is made.
Rob's Homemade LEDs (MK1)
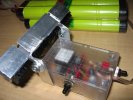
Two, 8 cell NiMH battery packs behind supply 19.2v. These are 4/3C size or something. Switch at back is on/off, switch on side is 3 position dimmer.
For a sense of scale, enclosure is 84x53x30mm and fits very easily in palm of my hand.